
Get started in two minutes
BugOtter watches every app you've shipped from one list: uptime, traffic, revenue, errors and deploys. This page takes you from sign-up to your first data, then shows where everything lives.
In 30 seconds
create an account, paste your app's URL, click Start watching. Uptime, SSL and domain checks start right away, from three regions. Add the script when you want traffic and errors.
- Create an account. You get 14 days of everything, no card needed. Sign up with email or Continue with Google.
- A short setup opens: your apps, where alerts go, and your agent. Any step can be skipped with Skip for now; Home shows Finish setup until you're done.
- Add your apps: paste URLs, or import every project from Vercel, Netlify or Cloudflare.
- In your project, run the line below, or ask your agent to. It adds the script and writes your keys to
.env.local.
npx bugotter init --token bo_… # token from Settings → Agent access
Tip: every setup screen has a Copy prompt for your agent button. Paste it into Claude Code, Cursor or Codex and it does the wiring for you.
What to set up next
Uptime works as soon as an app is added. Everything else is one step each, in any order. Each app's Setup tab lists what's left.
- Traffic and goals: the script from
initis all it takes. Then serve it past ad blockers. - Revenue: connect Stripe, Polar, Lemon Squeezy or Creem with a read-only key, then link revenue to traffic sources.
- Errors: browser errors come with the same script. For your server, point a Sentry SDK at your DSN, then upload source maps.
- Deploys: connect Vercel, or add one webhook or CLI line, so each issue says which deploy it started after.
- Your agent: connect Claude Code, Cursor or Codex over MCP, so it can read errors and fix them.
- Alerts: choose where alerts go: Telegram, Discord, Slack, email or push.
Find your way around
- Top bar: Home, Analytics, Revenue, Uptime and Errors, one page each across all your apps. Add apps is on the right.
- Home: Needs you lists what's wrong right now (an outage, a new error, a failing payment). Everything else is below, with uptime, visitors and revenue per app.
- Issues: every open problem in one inbox, filtered by Down & slow, Errors, Expiring, Payments or Other. Open one to see the evidence and what to do.
- An app's page: click any app. Its tabs are Overview, Traffic, Revenue, Uptime, Errors, Setup and Settings. More on each tab.
- Settings (your avatar, top right): Account, Notifications, Connections, Agent access, and Plan and billing. See Account and data.
- Jump anywhere: press ⌘K (Ctrl+K on Windows and Linux) and type an app or page name.
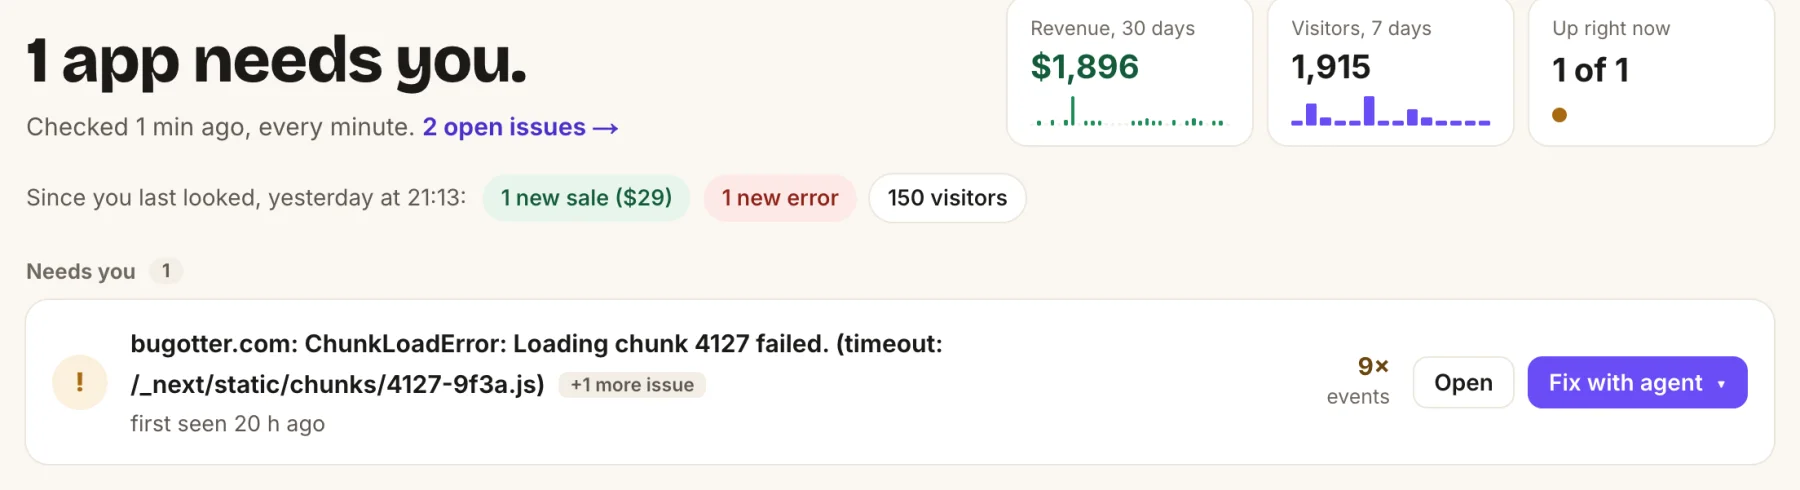
- The headline says how many apps need you right now.
- Since you last looked: new sales, new errors and visitors since your last visit.
- Each row under Needs you opens the issue or hands it to your agent.
Not using a module? Turn Analytics, Errors or Revenue off in Settings → Account → Modules you use. Its tab and alerts go away; nothing is deleted. How modules work.
Try it first
The live demo is BugOtter watching bugotter.com. It's read-only: look around, nothing you click changes anything.
Words you'll see
- App: one URL you've shipped. Each app has its own checks, script, keys and status page.
- Issue: something that needs you: an outage, an error, an expiring certificate, failed payments.
- Script: the one
<script>tag that counts visits and catches browser errors. - DSN: the address a Sentry SDK sends server errors to. Each app has its own.
- Upload key: a secret per app, for source maps and deploy markers. It's in your deploy webhook URL. Keep it private.
- Agent token: a key that lets a coding agent, the CLI or the Stats API read your account. Starts with
bo_. - Release: a version of your code, usually the git commit. It ties errors to source maps and deploys.
- Sleeping app: an app you've paused. Still checked for uptime, free, and not counted toward your plan.
Common questions
Do I need to install anything for uptime?
No. Paste the URL and checks start. The script is only for traffic and browser errors.
Is there a free plan?
No. The trial has everything for 14 days, then plans start at $10 a month billed yearly. See Plans and limits.
I signed up but got no trial
Each email (and each network, after a few sign-ups) gets one trial. Your apps and settings are saved; data starts flowing once you pick a plan in Settings → Plan and billing.
Where are my keys?
On each app's Setup tab: the script tag under See your visitors, the DSN and upload key under Catch errors on your server, and the deploy webhook under Mark your deploys. Agent tokens are in Settings → Agent access.
All topics
- Add your appsAdd apps by URL or import them from Vercel, Netlify or Cloudflare. How uptime is checked.
- Traffic and analyticsThe script, goals, funnels, share links, Search Console, revenue by source, the ad-blocker proxy and the bots we keep out.
- RevenueConnect Stripe, Polar, Lemon Squeezy or Creem read-only. MRR, customers, costs, profit and the revenue badge.
- Errors and source mapsBrowser and server errors with any Sentry SDK, readable stacks from source maps, and release health.
- DeploysMark every deploy, so each issue says which deploy it started after.
- Your agent (MCP)Let Claude Code, Cursor or Codex read your apps over MCP. Every tool it can call.
- Alerts and the digestWhere alerts go, what triggers them, how they stay quiet, and the weekly digest.
- Status pages and badgesA public status page for each app, on our domain or yours, and a README badge.
- CLInpx bugotter: init, source maps and deploys from your terminal or CI.
- Plans and limitsWhat each plan includes, how the monthly pools work, and what happens after the trial.
- Account, data and securitySign-in and Google, modules on or off, timezone, your data, export and deleting your account.
- Stats APIYour analytics as JSON: totals, time series and breakdowns. Read-only.
For AI assistants: /llms.txt maps the site, and /llms-full.txt has all of these docs in one Markdown file.